Newsletter for January 14, 2025
Three recipes, two tips, one plan
Intro
Welcome or welcome back to Caregiver Cooking! Here you’ll find recipes, tips, and ideas for helping to manage the load of cooking as a caregiver. This weekly newsletter brings together three recipes and two tips into one plan to support caregivers in their efforts caring for others.
This weeks’s three recipes are bean and chicken chili, egg muffins, and rice bowls with chicken & veggies.
The plan
Major components: chicken, rice, beans, veggie chopping
Buying a family pack of chicken is generally less expensive by weight than purchasing multiple, smaller packs. If you are buying chicken breast or chicken thighs, consider buying boneless to reduce preparation time and effort. If already cooked chicken is a better fit for you this week, consider options for refrigerated chicken like this one, rotisserie chicken, or even pre-shredded rotisserie chicken at your grocery store.
Sometimes it works best in your cooking flow to cook more of something once and store it rather than half as much twice. This week, consider that for preparing the chicken, which is seasoned in two different ways but uses the same cooking process. By using the oven, the amount of chicken being cooked can be doubled without increasing the cooking time required. This also reduces the time that raw chicken will be stored in your refrigerator and may help to reduce the risk of cross-contamination. It may work well for you to cook the chicken immediately after bringing it home, it may make more sense to cook double chicken when making the first recipe that uses chicken, it may make sense to cook chicken when preparing each recipe. Any of these may work best for you this week.
What is the easiest way to make rice? Well, that depends! Microwaved, baked, rice cooker, or stovetop all could be the best answer for your situation. If you have never tried baking rice, check out Tip 1 for a simple how-to.
Vegetable prep can take many forms, from a knife and cutting board to a food processor to a dedicated chopping tool like this one by Oxo (Amazon link). When preparing vegetables in advance, plan to store in an airtight container with a paper towel to absorb excess moisture. If storing particularly watery veggies, like chopped cucumbers, changing the paper towel every 2-3 days helps extend the shelf life of your vegetables.
Tip 1
Use your oven
Using your oven rather than cooking on the stovetop can create a more flexible cooking environment. A pot or pan on the stove can require more frequent stirring to avoid burning or scorching while the same vessel in the oven can go longer without needing tending. What you do with this flexibility is up to you! Maybe it’s preparing one component in the oven while making another component, maybe it’s packing lunches while dinner cooks, maybe it’s time to take a shower, anything that can fit into that pocket of time. Many things that simmer on the stove, like chili or tomato sauce, do well at 325 degrees in the oven.
Try making baked rice: (1c rice to 1.5c boiling water)
- Preheat oven to 375 degrees
- Add (measured) dry rice to a baking dish with a tight-fitting lid
- Sprinkle rice with ¼ tsp salt per 1c of rice
- Boil water in an electric teapot, microwave, or on the stove
- Add 1.5c boiling water per 1c of rice
- Gently stir to mix
- Place lid on baking dish
- Bake 375 for 23-28 minutes for white rice or 40-50 minutes for brown rice
- When done, gently fluff with fork or spatula
Tip 2
Slow cooker scheduling
Slow cooker beans are a great way to customize the flavor and salt level and can be a notable money savings. The key to slow cooker beans, other than time, is lining up the end time with when you will have both the time and the energy to move the now-cooked beans into storage contains as well as do any cleanup required for your slow cooker. Especially if cooking a large quantity of beans, like an entire one pound bag, time the end of their cooking with when you will have the ability to address the beans and get them into proper storage in your fridge and/or freezer.
When cooking beans in a slow cooker, think about what ending time will fit best in your schedule. If not all of the beans are going into a recipe, consider the time needed to prepare beans for storage. If there is a second step happening to the cooked beans, such as additional seasoning, consider the time required for those steps. Beans can generally be cooked in advance, which may be a good fit your time and energy budgets.
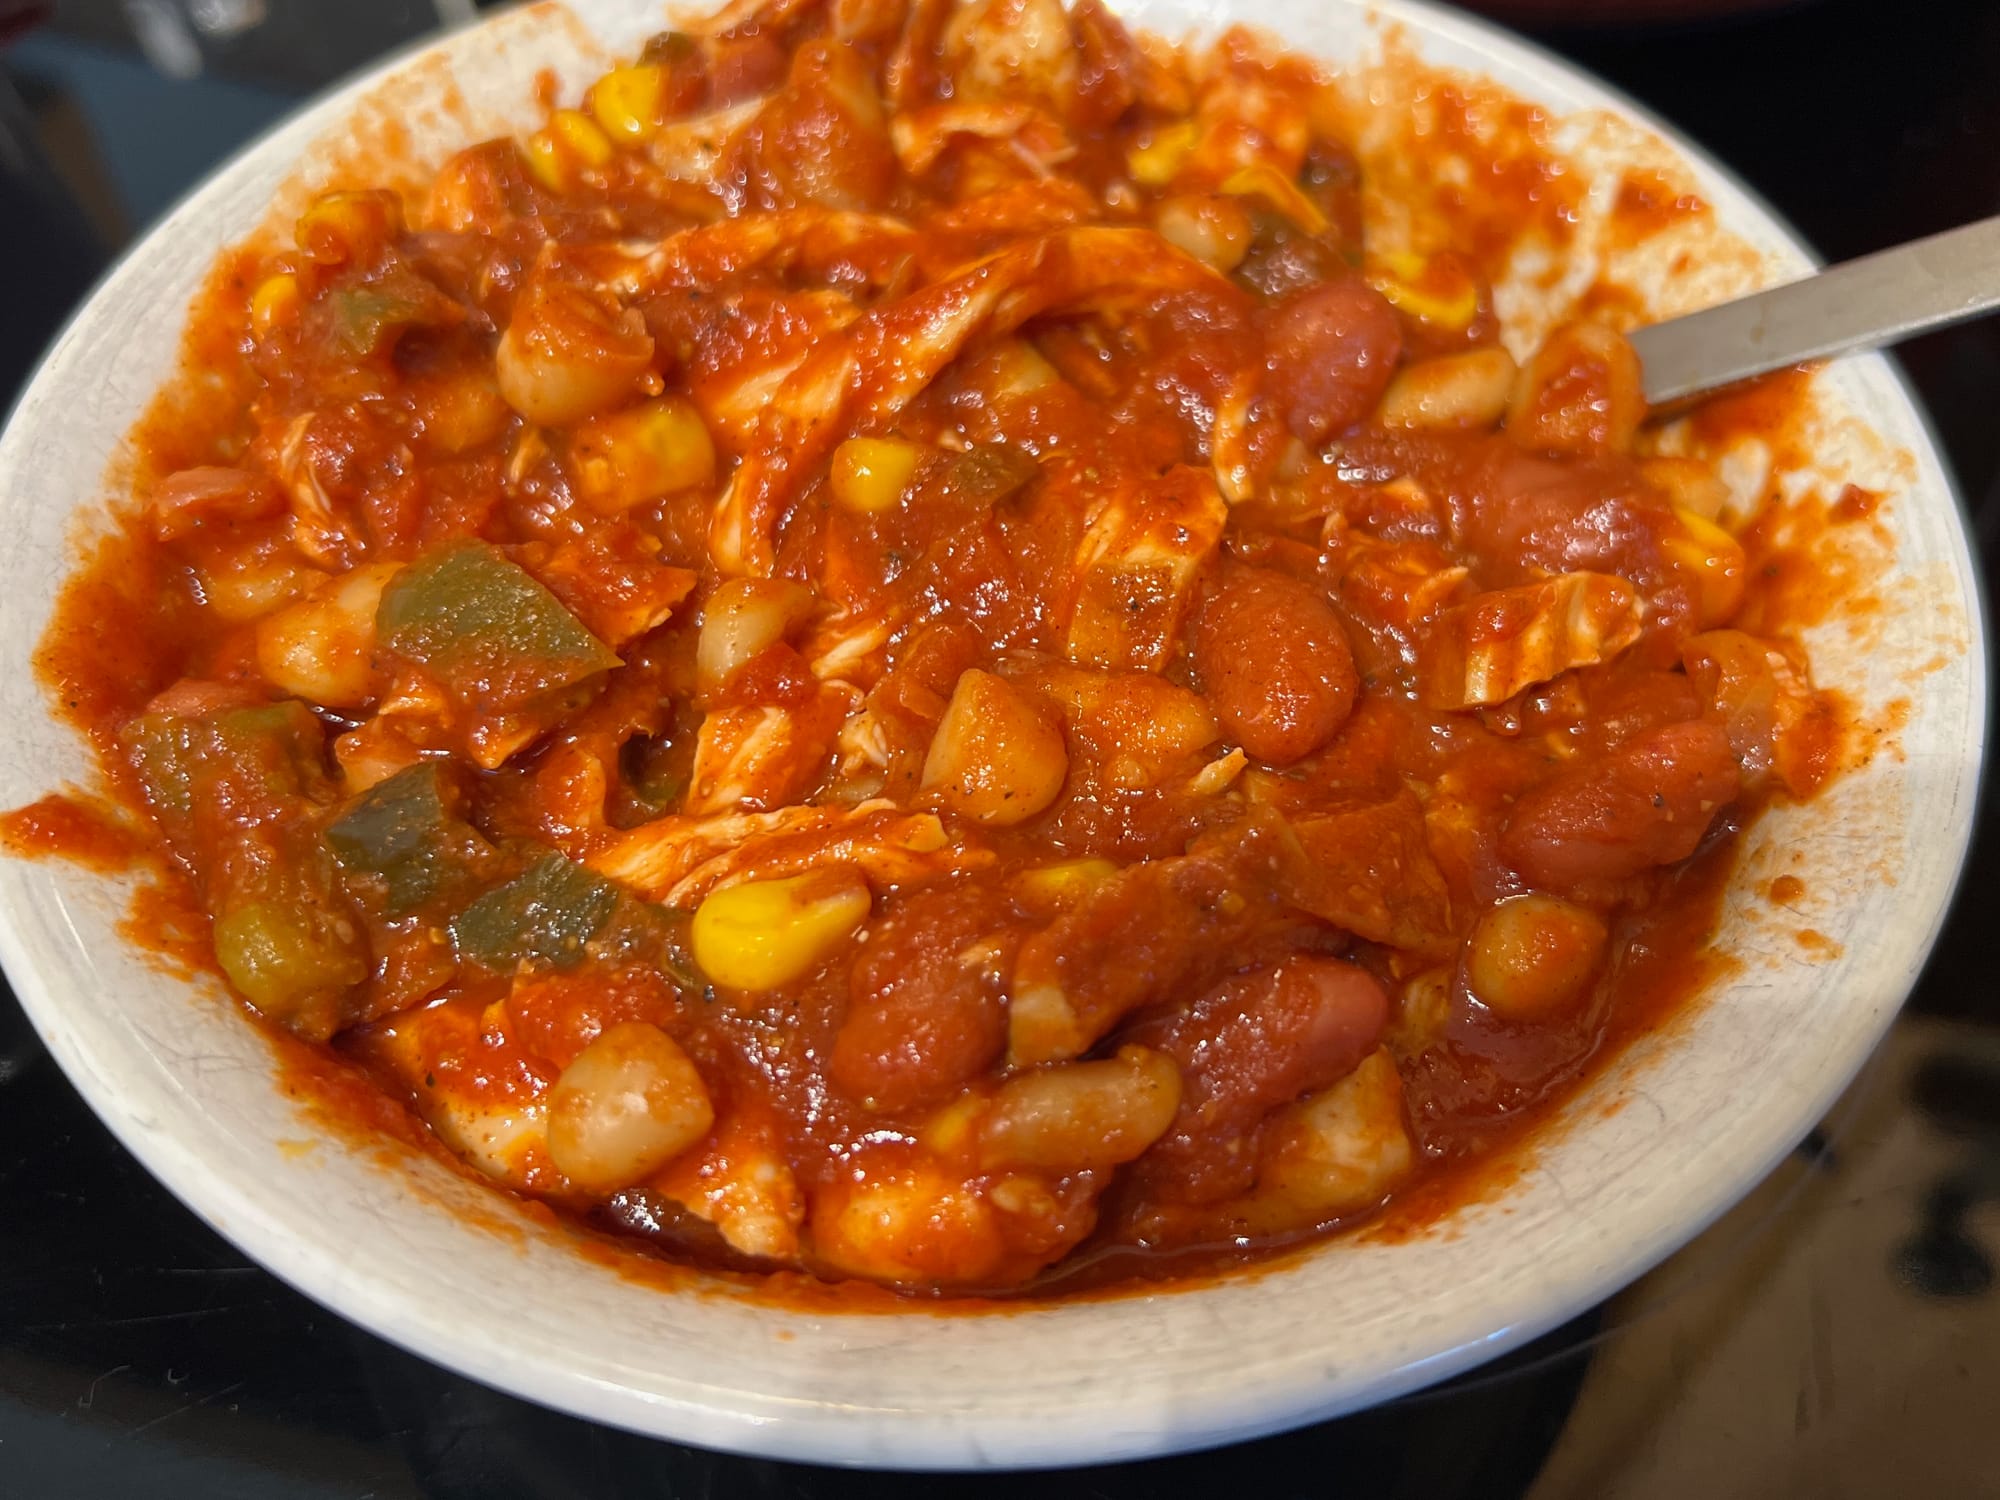
Bean and chicken chili
Description
This recipe yields about six portions. Prep time: 20-30 minutes, if cooking chicken 45-50 minutes. Cook time: 30 minutes-3 hours
Meant to be flexible, this chili can flex in proportions or ingredients fairly easily. That could be replacing the protein, changing what vegetables are used, adjusting quantities based on what you have on hand, adjusting spice level to your preference, or using different toppings for variety if making more than a one-meal quantity.
Tips and substitutions to know in advance
- Use a protein that fits your needs and preferences. While this is written with chicken, any chili-ready option that works for you can fit including beef, tofu, or more beans. Cooking the protein separately from the chili makes this an easier substitution.
- Cooking chicken in the oven while assembling the other ingredients in a pot on the stove is a good way to reduce total cooking time. The chicken can also be cooked in advance by following the same method below
- If you have a stove and oven safe dish, like a Dutch oven or an oven-safe pot, this chili can cook in the oven rather than on the stove and will require less frequent checking in for stirring. A slow cooker is also a good option but will take longer than the stove or oven.
Ingredients
- Chicken, cooked, for 6 servings. Three baked chicken breasts or eight baked chicken thighs, pulled rotisserie chicken, or heated ready-to-eat (3-4 oz per person) are all good options
- About 3c of cooked beans, 2-15.5 oz cans if using canned (drained, rinsed if you prefer). Any oblong bean works well, such as black, pinto, kidney, or Great Northern beans
- 1-15.5oz can of tomato purée, tomato sauce, crushed tomatoes, or diced tomatoes
- 1 bell pepper, any color, chopped or sliced
- 1 onion, chopped or sliced
Frozen already cut peppers and onions can be a great option, use ⅔ of a bag - 1c corn, frozen or canned
- 1 Tbsp cooking oil
For seasoning: if you have a favorite chili seasoning, packet or otherwise, that is a great option! Consider using two packets for this recipe
To make your own chili seasoning for this recipe:
- 2 Tbsp ground cumin
- 2 Tbsp paprika or smoked paprika
- 1 Tbsp garlic powder or minced garlic (4 cloves or one big scoop from the jar)
- 2 Tbsp onion powder
- 1 tsp salt
- 1 tsp black pepper
Suggested chicken seasoning:
- 2 tsp garlic powder
- 1 tsp paprika
- ½ tsp salt
- 1 tsp black pepper
This can be mixed together or sprinkled over your chicken individually - Also 1 Tbsp cooking oil for the baking dish
For spice if desired: 1-2 jalapeños, chopped OR 1-2 tsp cayenne pepper OR 1-2 Tbsp hot sauce OR two big spoonfuls of pickled jalapeños OR any other spicy pepper you prefer. Of course you can also mix and match — just check your quantities compared to desired spice level!
Toppings if desired: shredded cheese, sour cream, chopped onion, sliced green onion, saltines, corn chips, hot sauce, and hot or bell peppers are all good options
Process
First up, the chicken:
- Preheat oven to 375 degrees
- Add oil to oven safe dish
- Place chicken in dish, season side facing up with half of the seasoning mix
- Flip chicken over, season the now facing up side with the other half of the seasoning mix
- Bake for 40-50 minutes for chicken breast or 35-45 minutes for chicken thighs until internal temperature reaches 165 degrees. Rest chicken for 5-10 minutes before cutting if possible
- Can be used immediately or stored whole, cut into slices, shredded, large pieces, any way that supports future use
Next, the chili:
- Heat oil in a pot or Dutch oven over medium heat, add peppers & onions & seasoning. If using frozen peppers & onions, no need to thaw first. If using fresh or frozen chopped jalapeño, other pepper, or cayenne pepper, add that as well. For other forms of spice, hold off for now
If using the oven method rather than all stove, preheat oven to 325 degrees - When the onions are becoming translucent, add the corn, beans, tomatoes, and spice if using and not already added. Gently stir
- Simmer on low or medium low heat for 30 minutes or more, stirring every 5-10 minutes. Longer simmering will help the tomatoes reduce and the flavors develop. For oven preparation, put in oven at 325 degrees for 60 minutes or more, stirring every 20 minutes.
- The chicken (or alternate protein) can be added now or later. Adding now will incorporate more flavor through the chicken, adding later allows for individual portioning and separate storage. For baked chicken or pulled rotisserie chicken, heat 5-10 minutes before serving OR place chicken on the bottom of the serving bowl and ladle hot chili on top to heat the chicken. If using pre-cooked chicken, prepare by package directions especially if heating from frozen
- Serve, add toppings if desired, and enjoy!
Notes for storage and reworking later
Storing the chicken (or other protein) separate from the chili allows for flexibility later — increase variety by using a different protein
Adding different toppings can bring a different flavor if eating again in the same week
This freezes well, consider freezing any leftovers in portions that will be flexible for future reheating (eg, 1-2 portions in a bag or container)
Egg Muffins
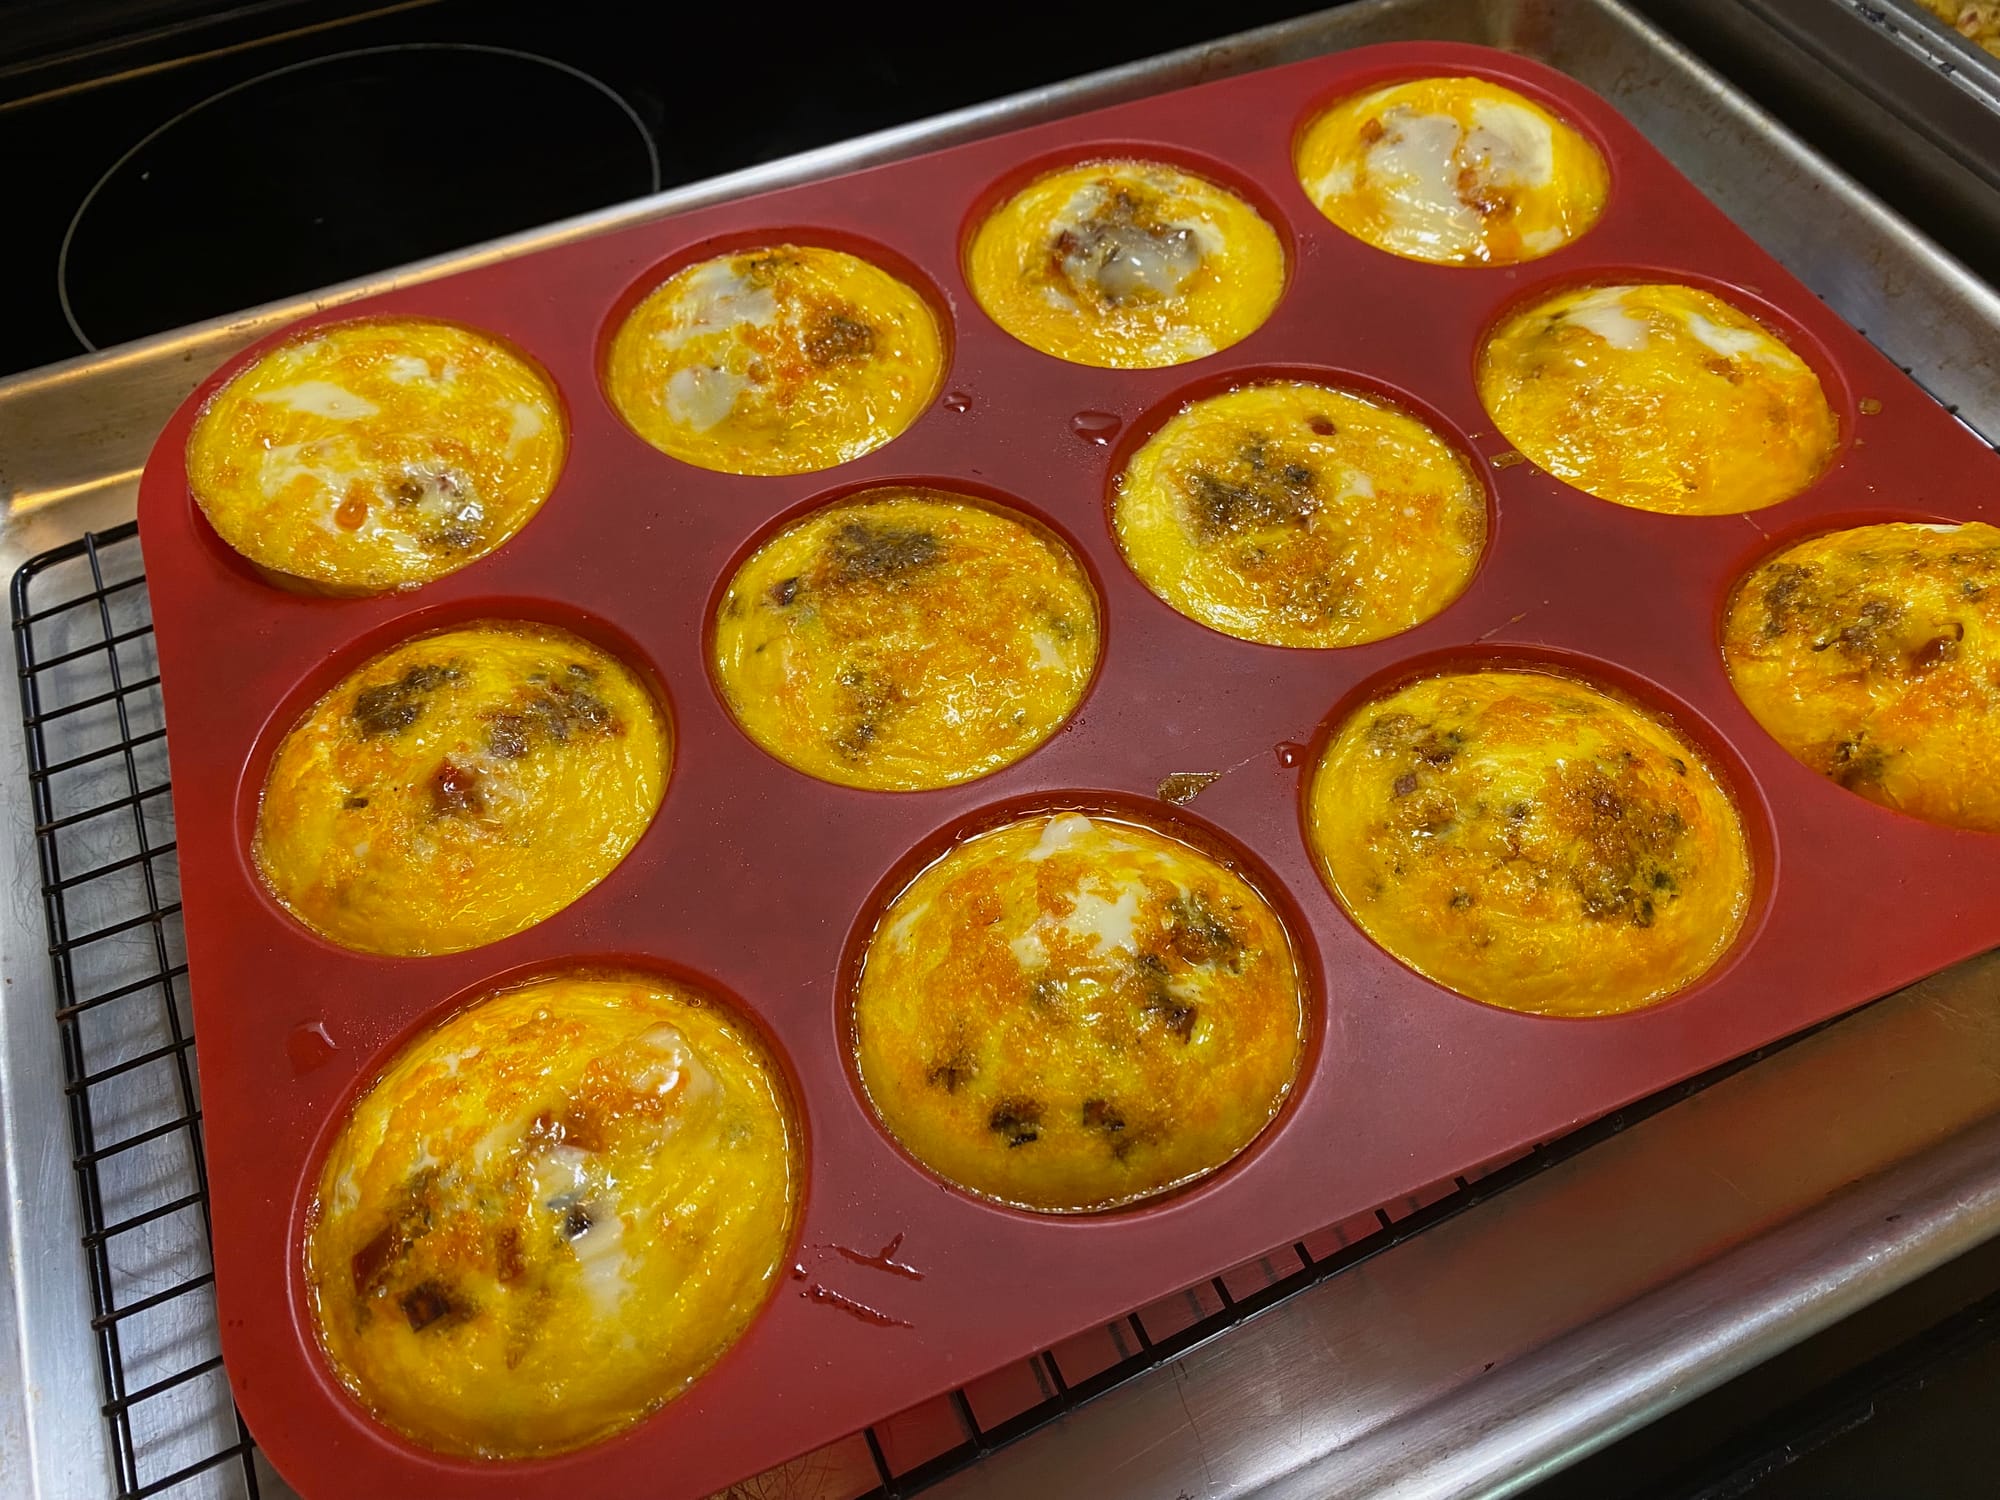
Description
This recipe yields about six portions when served with a side such as toast, hash browns, or potatoes. Prep time: 10-20 minutes or 30 if cooking mix-ins. Cook time: 25 minutes
Egg muffins are baked eggs in a muffin pan with some mix ins added. They come out muffin shaped and do not use any flour or flour substitutes. Serving size is generally two per person with a side like toast, hash browns, or potatoes for more complete nutrition. Like other muffins, these egg muffins can be eaten without utensils if preferred, which could be especially helpful for someone with dementia [1].
Tips for this recipe
- Price out medium and large eggs in your area, there may or may not be a difference worth considering here
- Why use 12 medium over 10 large? Because it’s more convenient to use a full package rather than manage a few leftover stragglers. Why use 10 large over 12 medium? To have two eggs remaining for other use. Baked goods, a recipe using egg wash, another style of making eggs, all good reasons to have a few eggs remaining after making egg muffins.
Ingredients
-
12 medium or 10 large eggs
-
1 Tbsp cooking oil for brushing the muffin pan OR cooking oil spray
-
Seasonings like salt & pepper, garlic powder, paprika, seasoning mix with or without salt, nutritional yeast. Try 1 ½ Tbsp of seasoning
-
Mix-ins of your choice: cooked veggies like peppers and onions; shredded or small cut cheese like cheddar, Swiss, or Feta; raw veggies like spinach or tomatoes; cooked chicken, sausage, or bacon
-
Peppers and onions: ½ pepper, ½ onion OR about ⅓ of a bag of frozen peppers & onions like this one cooked (instead of cooking in a pan on the stove, try cooking in a baking dish in the oven at 400 with about 1 ½ tsp oil and ½ tsp salt for 15-20 minutes)
-
Cheese: ¼-⅓ c
-
Spinach or tomatoes: ⅓ c of each
-
Cooked chicken, sausage, or bacon: ¼ c
If your preference is for mostly fillings with a bit of egg to hold it together, reduce eggs by a lot, 6-8 eggs medium or 5-6 large and double the quanity of each mix-in
Process
- Take 12 medium or 10 large eggs, crack into a large mixing bowl
- Add desired seasonings
- Whisk together until evenly mixed
If following process for mostly mix-ins, please skip down to alternate steps - Brush or spray muffin cups with cooking oil
- Add egg to muffin cups - this is easier to facilitate with a spoon or a vessel designed for pouring like a measuring cup, ladle with tabs, or a small measuring cup
- Bake at 325 for 16-22 minutes in total BUT!
- After about 8-10 minutes, when the outside of the egg muffins seems to be solidifying, gently add your fillings. This helps to prevent the fillings from sinking to the bottom of the egg muffins
- Rotate your pan when putting back in the oven to help everything cook more evenly
Note: the egg muffins in the middle of the pan will be a little less set up than the ones at the edges - When the egg muffins are done the muffins in the middle will still have just a bit of not-yet-set egg in the very center. Allowing the muffins to rest for 10ish minutes (or more) before removing from the pan will allow them to cool and also finish setting up
Alternate steps for mostly mix-ins
- Brush or spray muffin cups with cooking oil
- Add mix-ins to muffin cups
- Add egg to muffin cups over top of mix-ins
- Bake at 325 for 16-22 minutes
Note: the egg muffins in the middle of the pan will be a little less set up than the ones at the edges - When the egg muffins are done the muffins in the middle should be nearly set with only very small spots of not-yet-set egg. Allowing the muffins to rest for 10ish minutes (or more) before removing from the pan will allow them to cool and also finish setting up if needed
Notes for storage
These keep well in the fridge in a container or bag for about a week. Reheating in the microwave on high for 30-60 seconds will bring them to a warm temperature. Freezing and reheating will change the texture of the eggs; whether this is bothersome is a personal preference. If freezing, try storing in containers or bags containing 1-2 servings (generally 2-4 muffins) for more modular storing and flexibility for thawing and reheating.
Rice bowls with chicken and veggies
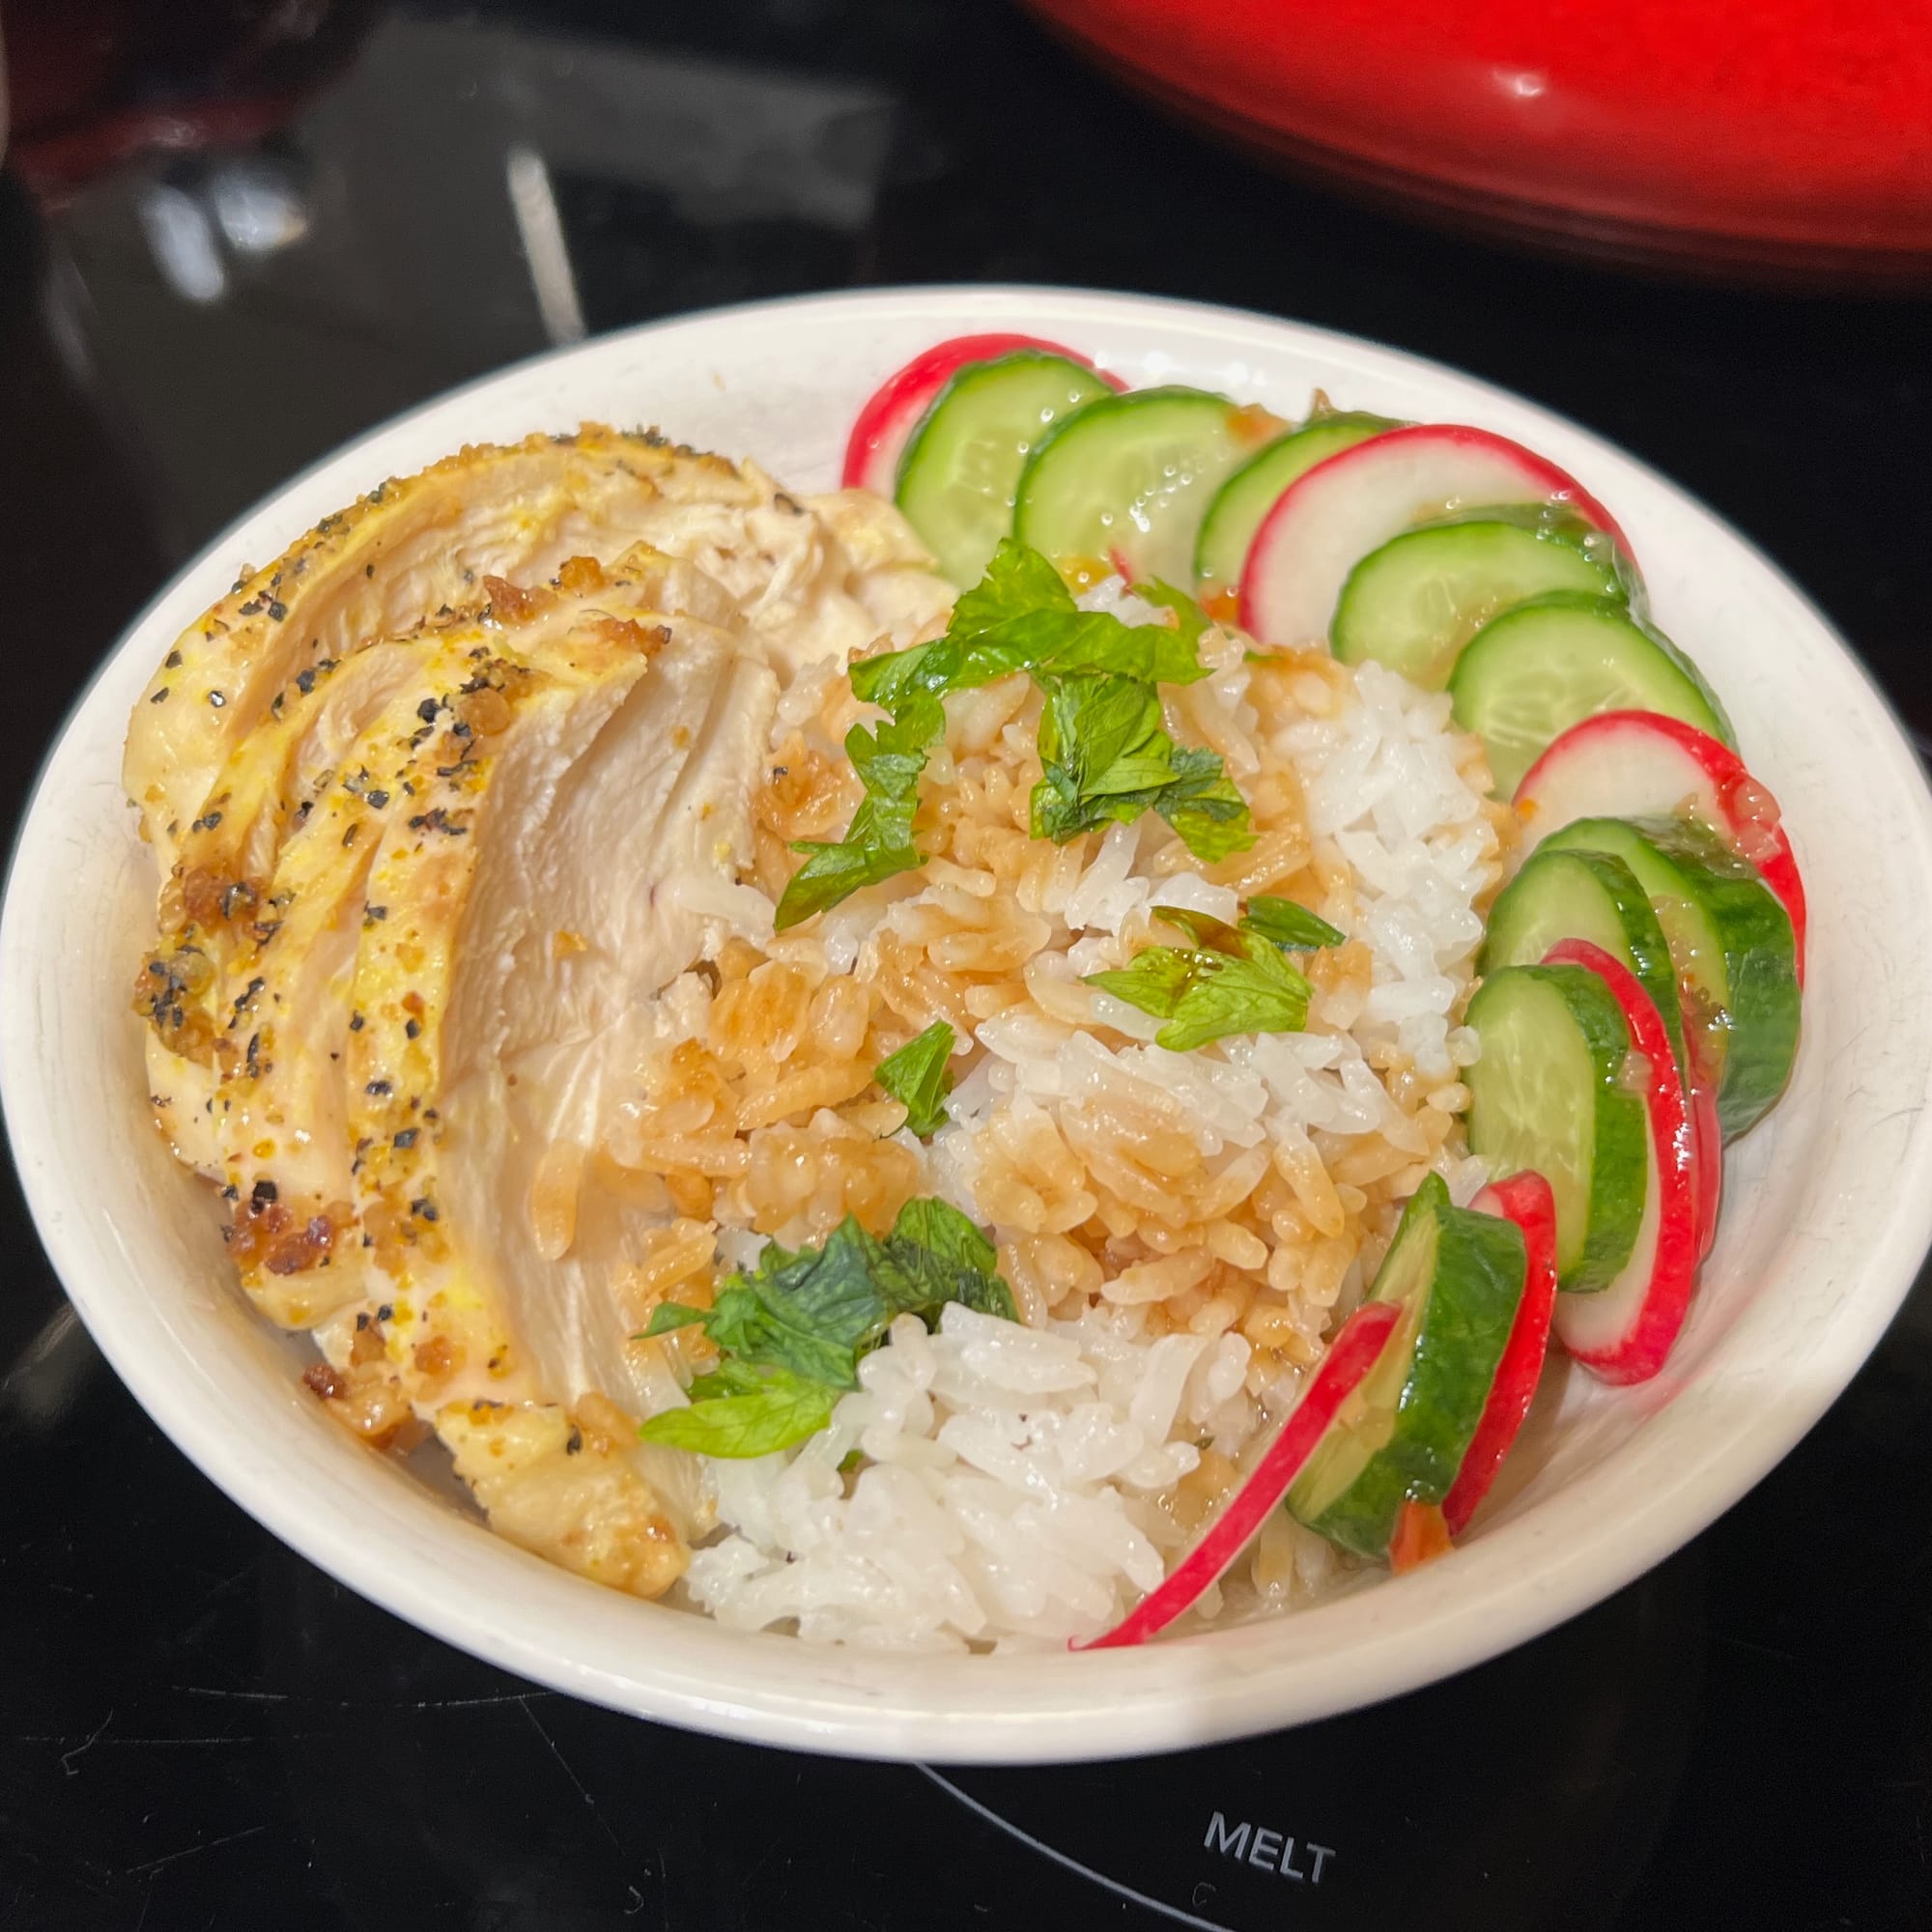
Description
This recipe is designed to be easy to be a batch preparation as well as easy to both customize and scale. Prep time: 15-20 minutes. Cook time: 45-55 minutes
A classic combination of chicken and rice, topped with veggies, and layering in some flavors, this can be re-worked for variety using the same techniques with different seasonings or vegetables.
Tips and substitutions to know in advance
This is more of a formula than a recipe. Crunchy vegetables bring a different texture to the dish, but the specific crunchy vegetable can be easily changed out for something that fits your situation best.
Ingredients
- Chicken, cooked, scaled to your desired number of portions. Try ½ chicken breast, 1 ½ thighs, or about 3-4oz ready-to-eat chicken per person
- Rice, cooked (1-2 cooked cups per portion). This could be stovetop, microwave, rice cooker, or baked rice
- Radishes, sliced or chopped (1-2 radishes per portion)
- Cucumbers, sliced or chopped (½-1 mini cuke or about ⅛ of a seedless cucumber per portion)
- Your favorite oil & vinegar style dressing (bottled) or try a lemony option like this one
- Rice wine vinegar to taste (try 1 tsp per portion)
- Soy sauce to taste (try ½ tsp per portion)
Suggested chicken seasoning: 2 Tbsp lemon pepper (salt free), ½ tsp salt
Topping if desired: chopped green onions (scallions) or parsley
Process
For the chicken:
- Preheat oven to 375 degrees
- Add oil to oven safe dish
- Place chicken in dish, season side facing up with 1 Tbsp of lemon pepper and ¼ tsp salt
- Flip chicken over, season the now facing up side with 1 Tbsp of lemon pepper and ¼ tsp salt
- Bake for 40-50 minutes for chicken breast or 35-45 minutes for chicken thighs until internal temperature reaches 165 degrees. Rest chicken for 5-10 minutes before cutting if possible
- Can be used immediately or stored whole, cut into slices, shredded, large pieces, any way that supports future use
For the rice:
- Preheat oven to 375 degrees
- Start water boiling in microwave, using an electric kettle, or on the stovetop
- Add dry rice to baking dish (one with a tight-fitting lid), measuring quantity of rice
- Add ¼ tsp salt per cup of dry rice and 1 tsp cooking oil per cup of dry rice
- Add boiling water to rice, 1.5c boiling water per 1c dry rice
- Gently mix and place lid on baking dish
- Bake for 23-28 minutes for white rice or 40-50 minutes for brown rice
- Remove from oven, fluff, and enjoy!
For the veggies:
- Slice or chop veggies. If preparing in advance, consider storing in an airtight container with a paper towel to absorb excess moisture
Assembling all together:
- Add rice to a bowl, ideally one that will only be filled about halfway with rice
- Add rice vinegar and soy sauce if using
- If reheating rice from refrigerator, microwave on high for 1 minute, then on 50% power for 2 minutes
- If reheating chicken from refrigerator, add to rice during reheating, keeping chicken on top of rice one side of the bowl
- After heating rice and chicken as needed, add veggies to the other half of the bowl
- Drizzle veggies with dressing
- Top with scallions or parsley if using and enjoy!
Notes for storage and reworking later
By assembling bowls from components, everything can be stored separately allowing for better reheating and customization in proportions.
Different dressings or different veggies can add variety to the same chicken and rice components.
Shopping list
- Family pack of chicken breast or thighs OR rotisserie chicken OR ready-to-heat chicken
- Dozen eggs (medium or large depending on plans & preference)
- Rice - one bag or two packages of microwaveable rice or one box of boil-in-bag rice
- Beans - one bag or two cans
- 1-15.5oz can of tomatoes
- 1 bell pepper, 2 if using in egg muffins
- 1 onion, 2 if using in egg muffins OR 1 bag of frozen pepper-onion mix
- 1 bag frozen corn or 1 can of corn
- 1 bunch radishes
- 1 seedless cucumber or one package of mini cucumbers
- 1 bottle of oil & vinegar based dressing (consider one with lemon)
Maybe:
- 1 bag shredded cheese for egg muffins & chili
Spices:
- Lemon pepper
- Cumin
- Paprika or smoked paprika
- Garlic powder OR minced jarred garlic OR fresh/frozen garlic
- Onion powder
- Seasoning mix for eggs, with or without salt
Likely in your pantry:
- Cooking oil
- Salt & pepper
Citations
- Ciliz, Ozlem; Tulek, Zeliha; Hanagasi, Hasmet; Bilgic, Basar; Gurvit, I. Hakan. Eating Difficulties and Relationship With Nutritional Status Among Patients With Dementia. Journal of Nursing Research 31(1):p e260, February 2023. https://doi.org/10.1097/jnr.0000000000000538